Planfix Integration
Integrate SMSBAT with Planfix CRM to send Viber and SMS messages directly from Planfix tasks and chats. This guide covers setup, template configuration, and chat automation.
Overview
The SMSBAT integration with Planfix allows you to:
- Send Viber and SMS messages to clients from Planfix tasks
- Automatically create tasks from incoming chat messages
- Reopen chats when clients reply
- Track message delivery status within Planfix
Prerequisites
- An active SMSBAT account with API credentials
- A Planfix account with administrator access
- An approved Viber Business message template (for transactional messages)
Step 1: Connect the Integration
1.1 Enable the Chat API in Planfix
Navigate to Account Management > Integrations > Chats > Planfix Chat API in your Planfix account.
Select the SMSBAT integration from the list and enable it.

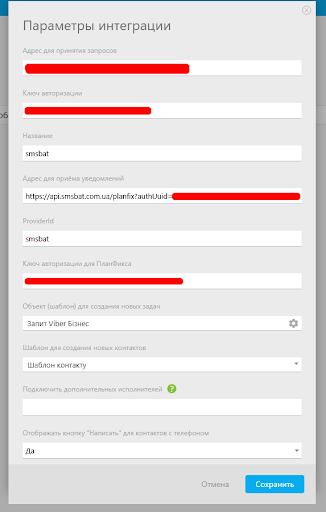
1.2 Configure Integration Parameters
Fill in the integration settings with the credentials provided by SMSBAT:
| Parameter | Description |
|---|---|
| Request URL | The URL provided by SMSBAT for receiving requests |
| Authorization Key | Your SMSBAT authorization key |
| Provider | smsbat |
| Notification URL | The webhook URL for receiving delivery notifications from Planfix, e.g. https://api.smsbat.com.ua/planfix/auth/uuid=... |
| ProviderId | smsbat |
| Planfix Authorization Key | Authorization key for Planfix side |
| Task Template | Select the template to use for creating tasks with chat |
| Contact Template | Select the template for creating new contacts |
Getting Credentials
Contact SMSBAT support at help@smsbat.com to receive your integration credentials (Request URL, Authorization Key, and Notification URL).
1.3 Task Creation Settings
Configure how Planfix handles incoming chat messages:
- Create a new task if there are no active tasks with this contact - Enable this option if your workflow involves short interactions or lead processing where each inquiry should create a new task.
- If your sales cycles are longer or you provide ongoing support, it is better to reopen existing tasks to keep the full conversation history with the client.

Step 2: Template and Chat Automation Setup
2.1 Configure the Greeting Template
Agree on a greeting message template with the client. Use a transactional message template to initiate the chat, as it is more cost-effective than a promotional message.
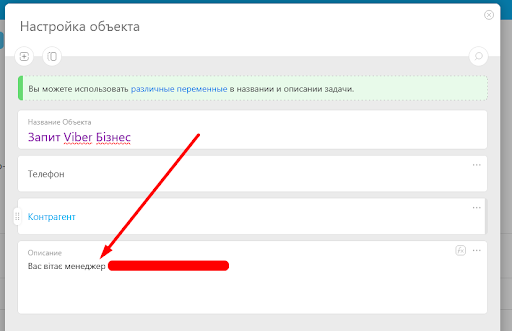
2.2 Set Up the Task Template
Add the approved greeting message template to the task template description field. When a task is created, the text from the description will be sent to the client as the first message.
Example task template configuration:
| Field | Value |
|---|---|
| Task Name | Viber Business Request |
| Phone | Client phone number |
| Counterparty | Client counterparty |
| Description | Your approved greeting message template |
2.3 Quick Interactions Workflow
If your workflow involves quick processing where you don't need to maintain long lead conversations:
- Process the client's chat inquiry
- Reply to the client via the chat in the task
- Set the task status to Completed
- When the client sends a new message, a new task will be created automatically (if the checkbox from Step 1.3 is enabled)
2.4 Ongoing Conversations Workflow
If you don't want to create a separate task for every client message, set up chat reopening automation.
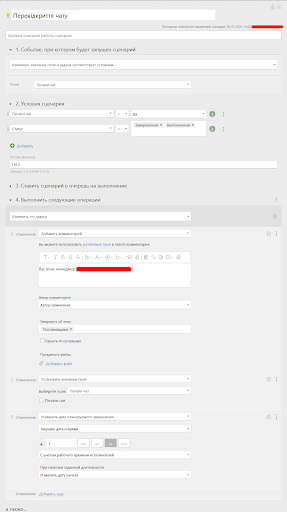
2.4.1 Reopen Chat via Transactional Message
Create an automation scenario that triggers when a task status changes to Completed or Done:
Scenario: "Reopen Chat"
| Setting | Value |
|---|---|
| Event | Field value changed |
| Field | Start chat |
| Conditions | Start chat = Yes AND Status in (Completed, Done) |
| Filter Logic | 1 AND 2 |
Actions:
- Add a comment with the greeting message template (notifying the contact as recipient)
- Set
Start chatfield to checked - Update the planned completion date to current date + 1 hour
2.4.2 Reopen Chat on New Comment
Create automation scenarios that reopen the chat when a new comment is added (either from a lead/client or from an employee):
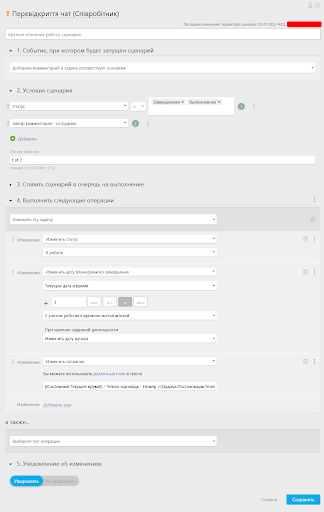
Scenario: "Reopen Chat (Employee)"
| Setting | Value |
|---|---|
| Event | Comment added matching conditions |
| Conditions | Status in (Completed, Done) AND Comment author = Employee |
| Filter Logic | 1 AND 2 |
Actions:
- Change status to In Progress
- Update planned completion date to current date + 1 hour
- Update task name with current timestamp and client info
Scenario: "Reopen Chat (Client)"
| Setting | Value |
|---|---|
| Event | Comment added matching conditions |
| Conditions | Status in (Completed, Done) AND Comment author = Contact |
| Filter Logic | 1 AND 2 |
Actions:
- Change status to New
- Update planned completion date to current date + 1 hour
- Update task name with current timestamp and client info
Step 3: Sending Messages (Lead Notifications)
Notification Recipients
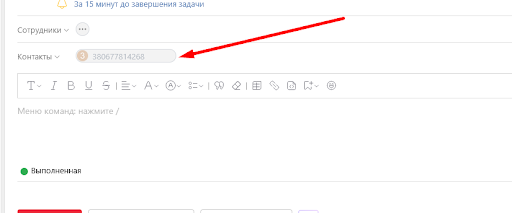
When sending a comment (notifying a lead), make sure the contact (lead) is checked as a recipient in the notification list. Note that the checkbox state may vary depending on conditions, so verify it before sending.
3.1 Checkbox Unchecked - Client Will Not Receive the Message
If the lead's checkbox is unchecked in the recipient list, the client will not receive the notification. You can use this to leave internal comments visible only to your team.
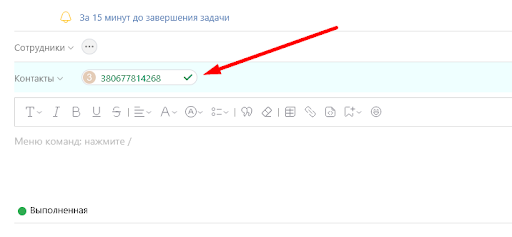
3.2 Checkbox Checked - Client Will Receive the Message
If the lead's checkbox is checked, the message will be sent to the client via Viber or SMS through SMSBAT.
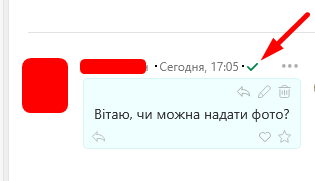
3.3 Verifying Message Delivery
Check delivery status in Planfix
Click on the checkmark icon next to a sent message to view the delivery report for all recipients of that comment.
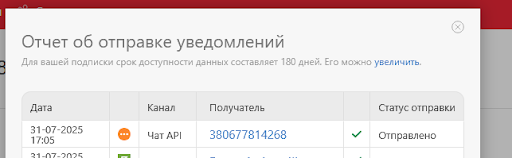
Verify in the delivery report
The delivery report should show the client as a recipient with the status Sent (without error status). The report shows the date, channel (Chat API), recipient phone number, and delivery status.
Best Practices
Template Setup
- Use transactional message templates for chat initiation (more cost-effective than promo)
- Keep greeting messages concise and relevant
- Test the template with a small group before rolling out
Task Management
- Use separate task templates for different Viber Business message types
- Enable the automatic task creation checkbox if you handle short, one-off inquiries
- Keep tasks open for ongoing client relationships to preserve chat history
Automation
- Set up both employee and client comment reopening scenarios
- Use planned completion dates to track SLA
- Configure notification recipients carefully to avoid unintended messages
Troubleshooting
Messages are not being sent
- Verify that the integration credentials are correct in Planfix settings
- Check that the contact's phone number is in the correct format
- Ensure the lead is checked as a recipient in the comment notification list
- Verify the message template is approved
Tasks are not being created automatically
- Confirm the "Create a new task if there are no active tasks" checkbox is enabled
- Check that the task template is correctly configured
- Verify that the Notification URL is properly set
Chat is not reopening
- Check that the automation scenarios are active
- Verify the status conditions match your workflow statuses
- Ensure the
Start chatfield is properly configured
Next Steps
- SMSBAT API - Learn about sending messages via API
- Cascade API - Set up multi-channel message delivery
- Message Types - Explore available message types
- Delivery Status - Understand delivery statuses